VisualAp is a visual framework for building application and systems based on visual components.
VisualAp can be used in order to perform audio processing, image processing, text and other process-driven emulation. VisualAp provides a visual framework based on lightweight components, called proclet.
The user can create an application by selecting the components from a toolbox, configuring the parameters (via the Javabeans framework), and connecting the components together in order to set-up communication channels between the components. Please click here and read the user guide for more information.
This application has been tested wit Java 11 and Java 25.
The project is built using command ant. The build process creates file visualap-setup.jar that is the installer of VisualAp application.
Create a folder where to copy the visualap-setup.jar and run it to install VisualAp:
java -jar visualap-setup.jar
After installation file visualap-setup.jar can be deleted.
Launch VisualAp with command:
java -jar visualap.jar
Here is a screenshot of the user interface:
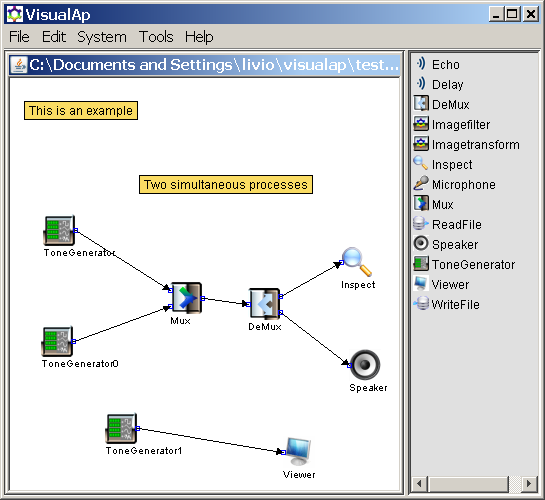
The user interface is described in more details here.
- Launch the application VisualAp, or select File->New if it is already running
- Select in the toolbox the “ReadFile” component, move and click the mouse pointer in the left side of the workspace: the component ReadFile is placed in the left side of the workplace
- Double-click the ReadFile component in the workspace: the properties window for ReadFile appears.
- In the properties window press the “Choose Filter” button, select the file “sassi.jpg” and press “Done”.
- Now select in the toolbox the ”ImageFilter” component, move and click the mouse pointer in the center of the workspace: the component ImageFilter is placed in the workplace.
- Connect the output pin of ReadFile to the input pin of the ImageFilter component.
- Now select in the toolbox the ”Viewer” component, move and click the mouse pointer in the right side of the workspace: the component Viewer is placed in the workplace.
- Connect the output pin of ImageFilter to the input pin of the Viewer component.
- Now check the system: System->Check, you should get a dialog with “System Check Passed” answer.
- Eventually you can run the system: System->Run, a new window pops-up with the inverted image.
- Double-click the ImageFilter component in the workspace: the properties window for ImageFilter appears. You can change the effect to 5x5Edge.
- Run the system, again System->Run, the image will change due to the new filter.
Additional information are available in the developer guide.
Echo: apply echo effect to audio streamDelay: apply delay to audio streamDeMux: split stereo audio in two mono audioImagefilter: performs basic filtering of imageImagetransform: performs basic transforms of imageInspect: shows the type of the incoming dataMicrofone: records an audio streamMux: generate stereo audio from two mono audio inputsReadFile: read a file, contains a property "file" -> a custom editor is used for file propertySpeaker: plays an audio streamToneGenerator: generate a simple audio tone, contains properties that are checked against max values, contains a property "type" -> a custom editor is used to select a specific valueViewer: shows the incoming data in a floating windowWriteFile: write a file, supported type: text, audio, image